Showing posts with label Swaps. Show all posts

Sunday, May 29, 2016

Peg Saint Aficionados Will Love This Book!

This year, my children and I were introduced to the worthwhile experience of painting peg doll saints for swaps.  We also have a long tradition of celebrating saint days together, often times through reading more about the lives of specific saints.  So, when I heard that an Encyclopedia of Peg Saints book, endorsed by Bishop Wall of New Mexico, had been published, I got ultra-excited and immediately looked up more information about it.


{Disclosure: of the links which follow are affiliate ones.  Should you click through them and make any purchase, we may receive small compensation at no extra cost to you.  Thank you for supporting us in Training Happy Hearts in our children and sharing about it here.}

I found a hardcover version of the book ETSY and a softcover one one Amazon, and, then, decided to contact one of its authors, Maggie Jetty, to see if I might receive a review copy of the book.  I was psyched that she agreed and even more delighted to discover that she and her husband Micheal, the book's other author, signed the review copy they sent me.  How sweet!


My Initial Plan for Our Encyclopedia of Peg Saints


As soon as I began flipping through our review copy of the
Encyclopedia of Peg Saints, I knew it was a book that I did not want my children to see right away.  We had recently led a saint peg swap for children, which all my children, and especially my daughter, had been excited about.  Since she wanted to host another children's swap, upon holding the Encyclopedia of Peg Saints in my hands, I immediately decided it would be perfect inspiration for her next swap and that, grouped with some new wooden pegs, a few new brushes, and some paints, the Encyclopedia of Peg Saints would make a perfect gift for my daughter's June birthday.


The birthday gift idea hatched, I tucked our copy of t
he Encyclopedia of Peg Saints away, planning to read it on the sly myself in order to write a review of it before wrapping it up with other bits and pieces to surprise my daughter on her birthday.


Our Plan - Take Two

 
My plan got foiled!

When a friend of mine and I were chatting about a Lady of Fatima event she was planning for our homeschool group, she asked me if I had any brief stories about Our Lady of Fatima that she could borrow for the event.  I recalled that the Encyclopedia of Peg Saints has a Lady of Fatima page and told her that I did not have a story, but I did have a beautiful page of 
 a book that she could share.  So, I took the book out to show her.


Unfortunately, I did not get our copy of the Encyclopedia of Peg Saints tucked back away before my children saw it.  Of course, they wanted to dig into the book right away, but I told them it was for something special and they could not yet dive into it.  I hoped they would forget they saw it.
Fat chance!

I took our copy of 
the Encyclopedia of Peg Saints along to our Our Lady of Fatima celebration for my friend to use, and, although we did not end up having time to share a page of the book with everyone at the celebration, my  son spied the book in my bag and began looking through it a bit.  Later that week, during a quiet moment, he asked, "Mom where did you put the encyclopedia?" 


"Encyclopedia?" I echoed, wondering what he was talking about.  In a recent box of pass-along books, we had been given a children's dictionary, a children's thesaurus, and some how-and-why books that I had decided to keep instead of passing forward, so I thought my son might be looking for one of those.  "Do you mean a different kind of reference book, Son?  They are on the white shelves."

"Thanks," he replied and went to get his sought-after book from the shelves.


A few moment later, he called out, "Mom, I can't find it.  I want the yellow one.  The one my friends and I can use."

Huh?  I thought utterly perplexed.  I could not think of a yellow reference book we owned, much less one my son might want to peer over with his friends.  "Oh, do you mean one of your Minecraft ones from the library?"

"No, you had an encyclopedia with saints in it that you said we could look at later.  Can I look at it now?"

The light dawned on me, I took the book out, and went to my son to say I wanted to use it to surprise his sister, even if she'd already seen it once, so he could read it, but I'd like him to do it in his bedroom.

My son did so, and got quite excited about surprising his sister.  In fact, when preparing to write this review, I asked my oldest what he thought about the Encyclopedia of Peg Saints and he said:


I got some peg dolls for Christmas.  I already used some of them in a swap and want to use more.  This book will help me...My sister does the swaps, too, and she has not seen the book much yet, so I want to make her a peg from the book for her birthday and have mom buy some more pegs, so we can give her the book and pegs for her birthday.

Then, he began looking through the book, so he could choose which saint he might like to paint.  My daughter walked in, and he said,  "Mom, hide it."


My daughter asked "hide what" as she spied the corner of the book peeking out from under a blanket.  "If you mean that book," she continued, "I've already seen it and looked through it a little.  I like it!"

I smiled and said, "I know you've seen some of it before, Sweetie, but not all of it.  Mommy thought with your birthday coming up, I might give it to you to own, but, since you've already seen it, it won't be a surprise.  So, I suppose you would not like it."

My daughter bubbled, "No, I would like it.  I want to paint more saints.  I want to have another swap!"

Then, when she left the room, my son smiled slyly and said, "And she doesn't know I am going to paint her one of the saints!"

So, now, not only have I affirmed that
the Encyclopedia of Peg Saints is quite appealing to children, but plan two for my daughter's birthday is underway:  she will, indeed, get our copy of the Encyclopedia of Peg Saints to keep, and she will also get some pegs - one of which will already be painted by her brother as a surprise gift for her.  Perfect!


Why Is This Book So Appealing

As I said before, I asked my son what he thinks about 
the Encyclopedia of Peg Saints.  Besides talking about how it will help him lead another saint peg swap for children and it has given him an idea for his sister's birthday, he said:


It's a really nice book.  I like how it has a saint symbol on each doll and describes them, like on St. Patrick they have a three-leaf clover and on St. Padre Pio there is stigma.  I also like that there are small facts around each photograph.  That's the kind of book I like for when I am learning stuff.  I like it better sometimes than just a story.  It makes it easy to get the facts down in my head.  I also like how in the back they have themselves, their sons, the priest and a bishop. 


I like the book's design a lot, but I wish it had even more saints.  I think they should make another volume of totally different saints, and even more of them. 


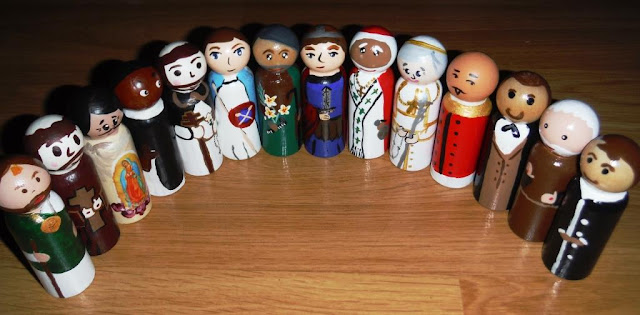
I concur that 
the 
Encyclopedia of Peg Saints is well-designed and filled with facts and illustrations that capture children's attention.  Each page features one of 36 different saints, with a photograph of a hand-painted saint peg doll in the middle of the page atop a light background that contains a photograph or fine-art painting of the saint.  Atop the background and around the peg saint photograph are many colored boxes filled facts, quotes, and information about the saint. The outside border of each page includes the saint's name and feast day.

This format makes
 the Encyclopedia of Peg Saints accessible for:


  • pre-readers, who can enjoy the images on each page as an older sibling, parent, or other reader reads information about the saint to the child
  • developing readers, who will likely be captured by the images in the book and, then, may be inspired to concentrate on a single box of information about the saint to puzzle out what it says
  • fluent readers, who, like my son, may pour over each page, devouring facts about the saints
  • aspiring peg saint painters, who will appreciate that the photographed models of peg saint dolls are beautiful, but not so complicated that they cannot be copied with a bit of practice
  • practiced peg saint painters, who will find plenty of information to inspire new peg saint doll designs


Truly, I think the Encyclopedia of Peg Saints is a book that can be appreciated by both young and old as a way to learn more about the saints while also being inspired to create art.  It also lends itself to other curricula connections for home educators and other teachers.

For example, the quotes included in the book are perfect for copywork exercises; information on dates and locations of saint births and deaths can connect to history and geography; and all the facts could act as seeds for growing self-written stories or reports.

In just over 36 pages, Maggie and Michael have put together a lovely, inspiring collection that includes the following saints:


  • Agnes
  • Thomas Aquinas
  • John Bosco
  • Blaise
  • Katherine Drexel
  • Dominic Savio
  • Patrick
  • Francis of Paola
  • Gemma Galgani
  • Mark
  • Our Lady of Fatima
  • Dymphna
  • Joan of Arc
  • Anthony
  • Maria Goretti
  • Benedict
  • Veronica
  • Kateri
  • Mary Magdalene
  • James
  • Christopher
  • Ignatius
  • John Vianney
  • Monica
  • Mother Teresa
  • Padre Pio
  • Gabriel the Archangel
  • Michael the Archangel
  • Therese of Lisieux
  • Francis of Assisi
  • Teresa of Avila
  • John Paul II
  • Juan DIego
  • Our Lady of Guadalupe
  • Lucy

For Future Volumes of the Book

Obviously, we love our copy of
 the Encyclopedia of Peg Saints, and we hope Maggie and Michael will make more volumes of it.  If they do, I'd like to officially request three things:

(1)  Practical Painting Tips and Information:  Surely those who peruse the
 Encyclopedia of Peg Saints will want to begin painting and having such information on hand would be quite helpful.  Thus, a few pages of how-to information, some tips on painting your own peg saint dolls, or links to where folks could find such information would be a lovely bonus in the book.


(2) Background Image Information:  While it is easy to find photographs and fine art paintings of saints online, I would love to have a list of the specific images used as backgrounds on each saint page of the encyclopedia.  The background choices in the Encyclopedia of Peg Saints and having a list of the names of each work would allow me to easily pull up a sharp, full-color image of the  images in order to do a Charlotte Mason-inspired picture study with my children.  Such art study, I think, would enhance and inspire the learning and painting the book already inspires.

(3)  More Saints - and One for Each Month:  My oldest son would love to see "tons more saints" in another book.  So would I.  I would also love to see at least one saint for each month of the year.  In paging through 
the Encyclopedia of Peg Saints, I noticed there is at least one saint for each month of the year except November.  I plan to use our Encyclopedia of Peg Saints as a resource for our liturgical year celebrations and would love to use it and a (hopeful!) volume 2 as a guide/inspiration for a monthly peg saint painting initiative.  Having at least one model saint per month would be helpful for this, but, of course, with 36 saints already featured, having no November saint page is A-okay.  There are plenty of beautiful pages to focus on!

Indeed, I am impressed with how much information and inspiration is packed into less than 40-pages in
the Encyclopedia of Peg Saints.  So, the three requests above are only offered as ideas for making a fabulous resource even better if a second volume is created (and I truly hope one is!)  In the meantime, we'll be thoroughly enjoying our "volume one" copy of the Encyclopedia of Peg Saints and recommending it highly to others!  Those who like to paint peg doll saints, celebrate the liturgical year, learn about saints, or gift unique Catholic items will all love this book, I think.  I know we do!


We truly love the Encyclopedia of Peg Saints and look forward to using it throughout the coming year.  For saint-study lovers like us, it is perfect!  Would it make a great addition to your saint resource collection, too?  Feel free to ask me any specific questions you might still have as you decide.

Sunday, February 7, 2016

Check Out Our Beautiful New Lenten Learning Tool!


As I prepare for Lent this week, I am excited by a new Lenten learning tool we'll be using this year:  Our Lenten Resurrection Eggs!


These eggs entered our home last week as the culmination of a local swap I participated in, which was inspired by Sarah, from Frugal Fun for Boys and her DIY Resurrection Eggs.  (I offered a How-To last week based on my experience.)

http://traininghappyhearts.blogspot.com/2016/01/make-your-own-lenten-ressurection-eggs.html

For our swap, each participating mom was asked to use paint, Sharpies, or a woodburning tool to create 13 eggs of a single design.  These eggs were then swapped for a set of 12 eggs to take home.  (The 13th egg each of us made went to a full set to be donated to a local Mom in need.)

Moms were also asked to paint the backs of their eggs.  Don't you just love how the collection of colors came out?

And, are you wondering why one egg is missing?  My children did, too.  So, I explained the truth to them:  Unfortunately, on the day of our swap, one mom was sick, so we are still waiting on our Day Four egg.  Until we get it, we can use the empty space as a reminder to pray for her and her family.

We will also put a list of who made which egg to keep in our egg box so we can remember to pray specifically for each of the families that participated in the swap as a part of our Lenten commitment to spend extra time in daily prayer.  (We did this same thing thing with our Jesse Tree and 12 Days of Christmas ornaments with much success.  The children loved recalling who made each swap item and offering special prayers for the families of the moms who made them.)

Want to See Our Eggs Up Close?


As I examined our eggs after receiving them, I loved the perfection of their imperfections.  Each egg is unique and beautiful on its own, and made even better as a part of a full collection.  See:


#1 A Palm Branch = People welcomed Jesus with palm branches during His triumphal entry into Jerusalem. 

#2 Bread and Wine = Jesus and the apostles gathered for the Last Supper and the institution of The Lord’s Supper.

#3 Lamb = Jesus became our Passover Lamb.


#4 Money Bag = Judas betrayed Jesus for 30 pieces of silver. (This one has yet to come, because one mom was sick.)

#5 Sword = Judas led an angry mob of Jewish leaders to Jesus in the garden, and Peter cut off the ear of the High Priest’s slave. Jesus healed the ear.

#6 Crown of Thorns = A crown of thorns was placed on Jesus' head.


#7 Nails = Jesus was nailed to the cross.

#8 Garment = The Jews cast lots for Jesus’ clothes, which fulfilled prophecy.

#9 Cross = Jesus was crucified.


#10 The Temple Veil =The veil was torn in two from top to bottom at Jesus’ death.

#11 Three Crosses = Two criminals were crucified next to Jesus.

 #12 The Empty Tomb = He is risen!


How Will We Use Them?

Throughout the Lenten season, our new Resurrection Eggs will be out as a decoration and hands-on tool.  On Ash Wednesday, I plan to use the eggs to prompt my children in a spontaneous retelling of the Easter Story.  After that, we'll use them as a reminder to pray for some of our local friends as well as for other intentions.  And, besides that, we'll use them however the children decide to do so, which, no doubt, will include keeping a young friend of ours entertained.


(A friend of mine took this picture of her son as he played with the eggs on the day I received them.  So cute!)


However we use our eggs, I know they will dovetail beautifully with past hands-on tools we've used during this season, which include:

http://traininghappyhearts.blogspot.com/2014/03/prepare-your-own-sensory-smart-holy.html


(Note: Some links in this post are affiliate ones.  If you click through them to make any purchase, we may receive compensation.)


http://traininghappyhearts.blogspot.com/2014/04/planning-hand-on-holy-week.html


Yes, our new Lenten Resurrection Eggs will be a welcome addition to some of our other family Lenten activities!  I am grateful to have participated in the swap.


What tools and traditions help you and the children in your life observe Lent?

Sunday, January 31, 2016

Make Your Own Lenten Ressurection Eggs

Swap-happy me has been at it again:


After realizing what NOT to do for a peg doll swap...

 
http://traininghappyhearts.blogspot.com/2015/11/saint-peg-doll-swap.html 

...sniffing all too many sharpies while making ornaments for a Jesse Tree swap...
 
http://traininghappyhearts.blogspot.com/2015/11/jesse-tree-swap-ornmanet-ideas.html


...and modge podging like mad for a 12 Days of Christmas ornament swap...


http://traininghappyhearts.blogspot.com/2015/12/12-days-of-christas-ornament-swap.html

..I decided I would teach myself how to wood-burn for an upcoming Lenten Resurrection egg swap.

(Note:  Some of the links below are affiliate ones.  Should you click through these to make any purchase we may receive compensation at no extra cost to you as per our Full Disclosure.)

 
How I Made Our Lenten Resurrection Swap Eggs

First, I broke our our brand-new woodburning kit, which we got at a discount around Christmastime in preparation for this project, and the bag of wooden eggs, which a friend purchased in bulk and divided with swap members.  I searched for the smoothest of the eggs since I wanted to dive in for the first time without having to sand.


Then, while the woodburning tool was heating up, I began searching for and sketching images of my assigned image:  nails.  An easy image, I know, but I wanted to land on a design that had a bit more oomph than a single nail or two.  So, the kids and I set to brainstorming.


Once I settled on an image, I drew it on a paper, turned the paper over, and colored the backside with pencil. I did this on scrap paper so the pencil markings from the drawn nail side would not transfer onto my table.


I then flipped the paper over on the image, and traced it.  Thereby transferring the image of the nails I had settled on -- old style nails in the shape of a cross -- into the egg.


Image drawn, it was time to woodburn. 

My first go went well, but I did end up learning something that I passed on in our swap group page:

When aging with long hair, pull your hair back before wood burning. As my developing need for bifocals got the best of me, I leaned close to my woodburning tool and egg. A bit of hair told me how close I was when it gave a singe scream (a quiet one) and sent off a putrid smell to break the silence of my woodburning concentration. Pony tail holder now in place! LOL


After burning just two eggs, my kids joined in the craftivity at our kitchen table by beginning to paint peg dolls for a kids' swap.  So, that was the end of my woodburning.  I simply could not concentrate on my project while helping them with theirs. 

The next day, Nina, grateful for my help the day before, offered to help me sand the rougher wooden eggs in my bag. 


We sanded and sanded, using multiple grades of sandpaper, but many of the eggs just would not completely smooth.  So, after consulting with several swap members, including the swap coordinator, I gave up on the sanding and added this tip to my future swap brain file:
Accept rough surfaces or buy Grade A eggs.  The "seconds" we bought just did not want to get smooth!

At that point, it was time to transfer the image onto the 11 eggs I had yet to do.  (All of us in the swap are doing 13 eggs so we can each keep one full set while donating a full set to a local mom!)


Then, it was back to my woodburning, with my hair tied back to avert further singing and my neck craned forward to make up for my aging vision. (Learning humility and acceptance is a BIG part of these swaps for me.)


Since my daughter wanted to help with this part, I let her play photographer, and, then, after she had been watching me carefully for some time, I allowed her to use a hand-over-hand method to burn some of the eggs with me

And, yes, before I let her delicate hands get so close to the ultra-hot tool, I said a prayer to both of our guardian angels.  For, while she had proved her patience and I was confident that she could burn the wooden eggs with me, I was nervous while guiding her little hand.

After letting her do a few eggs with me, I suggested she go back to being our photographer.


Between my daughter's efforts and mine, this is what our eggs looked like once they were all burned.


So, it was time for painting

The acrylic paint color I chose to paint the eggs looked like it was going to be a muted, almost pastel, "blood" color.  However, once I got it on the egg tops, I realized it was much darker.  I decided to go with the color even if it was dark since it seemed fitting for the nail image.


So, I after the tops dried enough, I did the fronts of the eggs, the back, and the bottoms, all leaving drying time in between.

The hardest part was the oval around the burned nail image.  I started these ovals quite wide around the images because I do not have the steadiest hands, and, then, each time the line of an oval looked too uneven, I simply closed the oval in a bit.  I found by tipping a paint brush on its side, holding it close to an egg, and rotating the egg around slowly, as opposed to moving my paint brush hand, I had the most luck.


Finally, all the eggs were done.  They were not perfect, but they were as good as I could get them and I was afraid if I kept trying to improve them, they would end up worse, not better.
 

I let the eggs dry for a day, did a few minor touch ups, let them dry again, and then set to sealing them. 

I had used layers of Modge Podge to seal things in prior swaps, but had since been told that it was not the best sealer.  So, upon a recommendation, I purchased Triple Thick glaze spray for this project, thinking it would be quick and easy to apply, with beautiful long-lasting results.


Such was not the case...
  First off, I thought our home was well-ventilated enough when I went to spray the eggs, but it was not.  I almost asphyxiated us all, I think.   Second, as soon as I sprayed, paint began to run off my eggs. Disaster!


Seeing my hard work at painting ovals arund woodburnt images dissolve, I tried to pick one egg up to wipe the running paint off with a rag, only to realize the was super sticky.  So, I did a quick wipe, used soap, water, and alcohol on my hands to wash the stickiness off, and, then, grabbed a plastic bag to use as a glove.

With speed, I "saved" as many eggs as I could and, then, transferred them all onto new bags to dry, so I could throw out the other smelly, sticky, paint-glaze pooled bags in the outdoor trash.


Since I did not want anyone to face the same near-demise my eggs did, I immediately posted in our local swap group about what happened and also asked about others' experiences in a national swap group.  I learned that many use Triple Thick, but few ever use spray, while others prefer Minwax.  I also learned that our local swap leader, indeed, uses Triple Thick spray for projects, and has for years, without any incident.So, after another 24 hours or more of letting the eggs dry, I bravely took the eggs outside on a tray and gave them a second coat to cover over anywhere my first effort at sealing may have failed due to my handling the eggs to wipe off running paint before the eggs had dried. 

This time, the spraying went much better.  No big runs happened and, after leaving the eggs on the stoop for several hours, I was able to take them in, let them dry over night, and transfer them to a carton.I was sad as I did so over the eggs that had been ruined.  However, I cheered up when another swap member who'd stopped by to return my woodburning tool, which she had borrowed, took a look  and said they were fine.  She could not believe how smooth my ovals were.  (Really?!?)  And, she thought the eggs had homemade character.  (Such a sweet and encouraging friend!)


So, now, my eggs sit ready to be swapped.  I cannot wait to see what the other moms did and to get my whole set of wooden Lenten Resurrection Eggs.


Credit Where Credit Is Due

Sarah, from Frugal Fun for Boys, inspired our local swap coordinator to suggest this swap.  Head on over to her DIY Resurrection Eggs post to checkout her wonderful work!

No Time for Crafting?
 

http://traininghappyhearts.blogspot.com/2014/03/prepare-your-own-sensory-smart-holy.html

If you don't have time for wooden egg crafting, you can easily whip up some sensory smart Holy Week/Resurrection eggs like I have done in the past.


You can also purchase ready-made ones, like this set we found at a thrift shop a couple years ago and enjoy annually.
 

http://traininghappyhearts.blogspot.com/2014/04/planning-hand-on-holy-week.html

Or, dispense with the eggs altogether, and enjoy some hands-on Holy Week art instead.


There are so many ways to bring the Resurrection Story alive for children.  How do you teach and review it with your kids?

Sunday, December 27, 2015

Want Ideas for 12 Days of Christmas Ornaments?


As I mentioned in yesterday's post, swap-fever has hit our local Catholic homeschooling group.  That means these beautiful hand-painted saint peg dolls were under the tree for my children on Christmas morning.

http://traininghappyhearts.blogspot.com/2015/11/saint-peg-doll-swap.html
It also means that all throughout Advent my children were able to enjoy hanging hand-crafted Jesse Tree ornaments on our Jesse Tree each night just before snuggling in for bedtime stories next to one of our Advent wreaths.


http://traininghappyhearts.blogspot.com/2015/11/jesse-tree-swap-ornmanet-ideas.html

Now, it means the children get to continue hanging hand-crafted ornaments until Epiphany as we make our way through the ornaments I received in our last swap and the 12 Days of Christmas devotional that I shared yesterday.

12 Days of Christmas Ornament Designs


Before organizing the ornaments and devotional in a box near our Jesus candle and Christmas tree, I photographed the ornaments.  Perhaps you'd like to take a peak at them to get some ideas for crafting your own 12 Days of Christmas ornaments:

Days 1 and 2 Fronts

Days 1 and 2 Backs

Days 3 and 4 Fronts

Day 3 and 4 Backs

Days 5 and 7 Fronts (I have yet to get a Day 6, because they were short on them at the swap.  There are Day 6 pics I took at the swap down further in this post though.)

Days 5 and 7 Backs

Days 8 and 9 Fronts

Day 8 Back and Day 9 Front

Days 10, 11, and 12 Fronts

Days 10, 11, and 12 Backs

I have photos of alternate ideas for inspiration, too (in no particular order):


Alternate Days 1 and 7 Fronts

Alternate Days 1 and 7 Backs

Super Cute Ladies Dancing Front

Day 9 Back
Alternate Day 2 Front

Alternate Day 2 Back

Alternate Day 3 Front

Alternate Day 3 Back
Alternate Day 5
Super Cute 6-Sided Day 6


Alternate Day 8 Back

Alternate Day 8 Front

Alternate Day 4 Front

Alternate Day 4 Back

Why all these alternate styles?   I wish I could say, "because I have two sets of ornaments."  Such is not the case, though. 

The real reason is because the organizer of this swap actually ran two swaps at the same time.  Some moms signed up for slots in both swaps so they could get one set of each style, but given my other commitments, I knew I would only have time to complete one set of 13 ornaments to swap.  So, I simply snapped photos of the ornaments at the other swap tabla fellow blogger, Shannon, who shared pictures of what she received at Homeschooling Papist.

Why Make 13 Ornaments if There Are But 12 Days of Christmas?

After the
hand-painted saint peg dolls swap I did, in which the organizer of this 12 Days of Christmas ornament swap participated, she and I had the same idea at almost the same time:  Wouldn't it be great if we all completed just one extra item for the swaps and then ended up with a set to donate?  So, beginning with this swap, the "one extra" idea was implemented. 

Coming soon, that will mean I try my hand at woodburning making 13 Lenten Resurrection Eggs so we'll have an extra set to donate.


I'd love to see YOUR 12 Days of Christmas ornaments, too - handmade or not - so please post a link here or post a picture on the Training Happy Hearts Facebook page.  Happy Christmas season!

LinkWithin

Related Posts with Thumbnails