Showing posts with label Skills. Show all posts

Sunday, September 4, 2016

How We Plan to Celebrate the Canonization of Mother Teresa + a SKILL TIME Round Up!

This past week was not an easy one in our home, so I did not make time to prepare for today's canonization of Mother Teresa until just about about midnight. 


Luckily, when I did so, I was HUGELY blessed by the FREE sharing of so many fellow Catholic folks online.  In fact, I discovered enough fabulous finds that I was able to easily prepare for our canonization celebration later today as well as for some of our S.K.I.L.L. T.I.M.E.+ lessons for the coming week. 

Mind you, "easily" does not mean "quickly". 

I admit, I get so excited when doing things like this that I sometimes lose track of time and, um, sleep.  So, let me spare you the same predicament by sharing the oodles of awesome Saint Teresa of Calcutta goodies I found online, as well as some I was inspired to jot down.

I hope the following extensive round up will help you pull together your own last-minute lessons and fun!  Enjoy.

A Simple Canonization Breakfast

There is no time for shopping and little energy for baking at this late hour, so my plan for the morning is simple:


Decorations

Mother Teresa wore a blue and white sari, so we will decorate our table simply in blue and white with a table cloth and candles.  

Credit: A Slice of Smith Life

If I can find my son's blue duct tape, I may "stripe" our candles much like Tracy at A Slice of Smith Life did for her family's early canonization celebration, and, then, share excerpts of The Significance of Mother Teresa's Three Striped Sari with my children since we all enjoy symbolism.  If I cannot, I will likely still share the symbolism with my children later in the week.

I have also printed out Jessica's canonization cupcake toppers, free at Shower of Roses, to put into our Canonization Waffles (described below).

Food


A quick peek in our cupboards, freezer, and fridge told me pickings are slim after our week of being quarantined at home, but "treat" foods stocked for Sundays will save the day!  


{Disclosure: Some links that follow are affiliate ones.  If you click through them and make a purchase, we may receive compensation at no extra cost to you.  Whatever we make goes right back into Training Happy Hearts in our children and sharing about it here.}


We have Van's Gluten-Free Waffles, So Delicious Coco Whip, and Chocolate Silk.  These, along with the few fresh blueberries we have, some defrosted strawberries and raspberries, maple syrup, and Earth Balance "Butter", will help me turn our "Assumption Day Waffles" of old into  Saint Mother Teresa of Calcutta fare.

As usual, we will enjoy "faith formation through food" by chatting about how each part of our meal might connect to Saint Mother Teresa.  If I know my children they may decide:


  • The brown of our Chocolate Silk reminds us of our earthly humanity.
  • The blue and white of berries and Coco Whip remind us of multiple things - the heavens, the colors of Mother Teresa's sari, and Mother Mary's colors (which are the colors Mother Teresa purposefully chose for her sari).  
  • The red of berries call to mind hearts - the daily love and compassion Mother Teresa lived with, hearts for the poor including the poor in spirit), hearts for Jesus...
  • The roundness of our waffles may remind us of the earth, and how we are called to live our loves here with love for one another.  Or, it may bring to mind the eternal joy of being in Heaven with Jesus (for a circle has no end...)
     
Prayers and Reading


Credit: Amazon


Over the past two days, the children and I have been enjoying a copy of Living Faith Kids: Meet Mother Teresa which we picked up at church last week.  We'll revisit this sweet booklet and also read the Mother Teresa excerpt from our copy of Loyola Kids Book of Heroes.


We will also pray the Mother Teresa's Nazareth Prayer for the Family.

S.K.I.L.L. T.I.M.E. + with Some FREEBIE Links

Each week as a part of our lessons, we focus on S.K.I.L.L. T.I.M.E.+, an acronym I came up with to help remind us to keep literacy and math at the fore of our independent and mentored study time, while adding in other "subjects", too.

Already, I can see our
S.K.I.L.L. T.I.M.E.+ efforts shaping up for the coming week with all the Saint Mother Teresa of Calcutta ideas I found and what they brought to mind for me.

S - Spell and Write Words 


On whiteboards, we'll see how many words we can make with the letter from Saint Mother Teresa of Calcutta.  We may also use the Can Do Cubes I recently reviewed to spell out "saint", "mother", etc. and see what we can change those words to by adding, taking away, or moving one block at a time.

K - Keep Reading to Yourself

 Credit: Holy Heroes


I just ordered a whole bunch of Mother Teresa books from the library just now, so we'll have a plentiful basket for the children to draw from.  I also just printed out Holy Heroes inexpensive Mother Teresa coloring book, which the children can enjoy coloring, and, then, reading on their own (or with me) depending on the child.

I may also introduce a simple activity from Sadlier to the kids and as they complete small acts of love they can read the hearts on the sheet and color them in throughout the week.

Plus, they are rather "schooly", but, at some point this week, I may offer my children the simple Mother Teresa Reading Warm Up from Teacher Vision or the work packet at Really Learn English (
which is meant for ESL students but has some value for my children in portions, too).

I - Illustrate and Write


Credit: Real Life at Home 

 
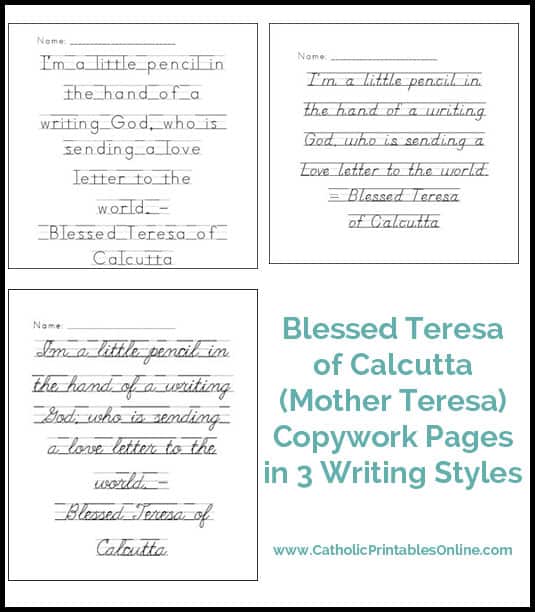
Angie at Real Life at Home and the Lawrence Family at Catholic Inspired are providing this week's FREE copywork for my children.
 
Credit: Catholice Inspired
Credit: Catholic Inspired

Tara at This Sweet Life of Mine is, too.  She has also made reading comprehension, writing, and more a breeze.  (I  just love the FREE mini-unit pack she has gifted readers of her blog like me.)


Credit: This Sweet Life of Mine

We also might try a how-to-draw at dragoart.com.  It could be a flashback to five years ago when we did a collective family sketch of Mother Teresa.

 
Listen to Reading

Credit: Holy Heroes
I have already mentioned the inexpensive Holy Heroes Mother Teresa coloring book I've printed out and the bevy of books I've ordered from our library.  We'll also be listening to our Holy Heroes Glory Stories CD Vol 4: St. Teresa of Calcutta & St. Faustina Kowalska if I can find where I laid it (and I hope I can!  If not, I may just have to order a new copy since it is on sale this week.)

I may read the story of Mother Teresa I found in lesson plans at Catholic Relief Services, too.

Learn and Play with One Another Using Language Arts

Credit: A Slice of Smith Life


Tracy from A Slice of Smith Life shared a ton of ideas for a Canonization of Mother Teresa lapbook.  I may borrow some of these for notebooking pages here! I found a wonderful printable lesson plan pack on Mother Teresa and charity at Our Lady of Fatima Catholic Church's website that has me envisioning a trivia type Q & A game with among other things. 

Plus, Learning to Give has a quick True/False quiz that aligns to the reading in
the Mother Teresa excerpt from our copy of Loyola Kids Book of Heroes, so when we need to burn some energy inside this week, we may be playing a hallway game where we run to one side of our hallway for "true" and another side for "false".
I also found a skit within a long and varied FREE lesson plan pack download at Ave Maria Press.


T - Think, Read and Write About Math 


We will likely make a host of story math problems related to Saint Teresa of Calcutta.  Thing such as:
  • How long did she live?
  • How many years passed between when she became a "Blessed" and when she was canonized?
  • How many years was she a nun?

I - Investigate and Problem Solve with Math


 I realized this past week that two of my children did not know the math term "capacity", so we may just need to make some Indian foods (lentils and rice) this week as living math making sure to speak about the capacity of our measuring cups.

M - Master Math Skills Together

Credit: The Religion Teacher


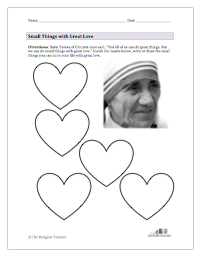
We have not done much for graphing lately, so I may combine the freebie Small Things with Great Love sheet from The Religion Teacher with a graphing exercise, having the children record small things they can (and do!) do with great love, then sorting those things to make different kinds of graphs.

E - Exercise Math Skills on My Own


The children can extend some of the aforementioned math learning and skill work.
+ Extra Learning and Exploration


 Of course, will be chatting about how a person becomes a names saint and about what the miracles approved by the church were during the cause for Mother Teresa's sainthoodAmerican Catholic.org has a lot about all that.

This video may also be enjoyed:


Finally, although I am tempted to stay up and watch the entire canonization live now since the time for it is getting close anyway, I am also aware that this mama has to get at least a few hours of sleep, so I will be watching it with my children later, I hope.


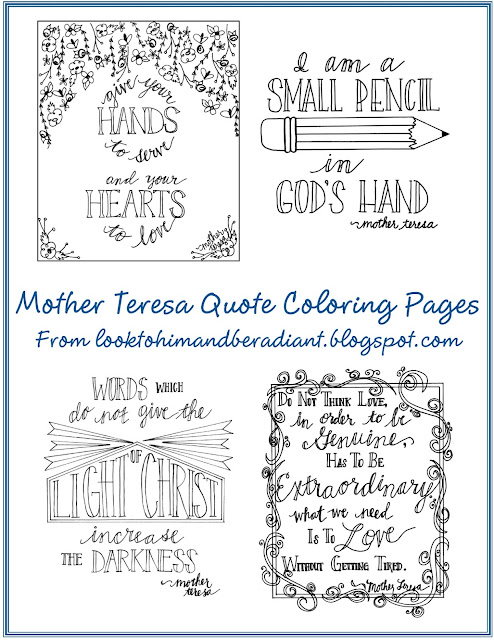
While we watch it, if anyone gets antsy, they can always paint or color any one of the many free Mother Teresa coloring pages and quotes I have found online at:


Credit: Look to Him and Be Radiant


Waltzing Matilda
Life, Love, &  Sacred Art
Brother Francis Online
Look to Him and Be Radiant (and here)
Catholic Kids BulletinPaper Dali


And, there you have it...  Me, busy printing, planning, and getting excited for a canonization and a mini S.K.I.L.L. T.I.M.E + unit in the coming week... and short-sleeping myself because of it.  So, I better catch some shut-eye now. 

I hope some of the ideas here help you quickly find just what you may be looking for to learn about and celebrate the newly sainted Saint Teresa of Calcutta!

Do share other links and ideas in the comments.  Thanks!

Thursday, July 25, 2013

Summer Science: Bubbles Exploration and the Scientific Process

Lately, Nina has been fascinated with just how many ways she can explore bubbles.
One recent morning, we had the pleasure of watching a friend's daughter.  It was a hot morning -- one when it was actually cooler outside in the shade than in our non air-conditioned house -- so I decided that some outdoor play and learning were in order.  Thus, unfolded:

Bubble Exploration and the Scientific Process
An easy summer activity that requires inexpensive ingredients you may already have at home.
 
(Apologies, in advance, for the poor photo quality.  Our family point-and-shoot has broken, so I have been using my daughter's "play camera".)

Materials
Measuring out ingredients.
  • a place to display recipes (We used a plastic chalkboard easel.)
  • a tray
  • two bowls
  • water (We put ours in a pitcher for easy pouring)
  • dishwashing detergent (We used Joy.)
  • light corn syrup (You can also use glycerin.)
  • bubble wands, straws, etc.
  • optional empty bubble containers and wands from all-used-up store-bought mixes
  • a table and chairs, if you wish
 
Presentation 
The Recipes We Tested
  1. Write out and post two homemade bubble recipes and gather supplies for making them.
  2. Chat about what you know about bubbles and what you would like to know.  Together, decide on a question you'll focus on.  (In our case, it was which bubble solutions would make the best bubbles.)
  3. Do some background research.  This can be as easy as having young children discuss things with an expert or someone who knows a little more (which is what we did), or it can involve books, the internet and other research.  The idea is to ignite thinking.
  4. Construct a hypothesis, together or individually by making an edcated guessa tthe answer to a question.  (In our case, Nina, Jack and our friend hypothesized that the second bubble recipe would make the best bubbles and Luke and I hypothesized that the first would.  We noted our hypothesis by putting our first initial next the the recipe on our chalkboard.)
  5. Make the bubble mixes and test your hypothesis, taking extra care to measure and stir well and to be observant of everything that happens.  (In our case, this involved taking turns to slowly measure and mix all of our recipe ingredients and, then, testing the two solutions we created out by blowing bubbles and carefully observing the results.)
  6. Analyze your data and draw conclusions informally through observation and discussion or, more formally, with written notes.  (We opted for the former, although we did jot a few observations down on our chalkboard.  The kids results were that the recipe with less water made better big bubbles and the one with more water made better smaller bubbles.)
  7. Share your results.  (We did this through sharing what we did, how we did and what we discovered with our friend's mom and with Daddy.  )
  8. Enjoy!  Be sure to leave room for lots of exploration and discoveries.  Bubbles are all about science AND fun, after all! (We ended up blowing bubbles with traditional bubble wands, ball and other found materials and straws.  We blew them "normally", onto plates, into our hands, etc.  We wet our fingers and small toys with bubble mix and passed these through bubbles without breaking the bubbles.  We made bubble bowls and snakes... And so much more!)
  9. Make new hypothesis if you wish.  (We have begun discussions about what recipe tweaks may work well for next time.
 
Skills
After Luke tried to make bubbles by dunking a ball in bubble mix and hitting it with a bat, Nina began experimenting with blowing bubbles through the ball with a straw.

  • Scientific Process (asking questions, research/discussion, constructing hypothesis, testing hypothesis/observation, drawing conclusions, sharing conclusions)
  • Science (discussion of properties -- solids, liquids, etc.)
  • Reading (simple Decoding when reading the recipe)
  • Practical Life (measuring, following directions)
  • Sensory (oral-motor, tactile, visual)
  • Math (measuring, counting)
  • Creativity (free exploration of bubbles after hypothesis has been tested, what types of things can we make bubbles with, what can we do with bubbles)

Quick Tips/Extensions
 
Jack was so proud to make hold bubbles with his hands.
  • Reinforce the "scientific process" concept by using lots of language about "being scientists" and what strong scientisits do.  Keeping things fun, and without overdoing it, pepper the experiment and exploration with articulated science words and concepts.
  • Experiment with different bubble recipes.
  • If you have children who are learning to count still, add a lot of counting in.  How long does it take before a big bubble bursts?  How many bubbles can you pop? Etc.
  • Focus on language skills and concepts by talking about things such as opposites (big/small, wet/dry, etc.), comparisons (more/most, big/bigger/biggest, etc.), etc.
  • Add further literacy and extensions by exploring any of the books shared in our 2010 post Book Nook:  Bubbles!  Bubbles!
  • Extend with bubble-related sensory activities like those shared at 7 Sense-ational Ways to Use Bubbles.

What are your favorite bubble recipes and activities?  And what simple summer science activities have you been enjoying?  


Thursday, June 7, 2012

We Build It: An Impromptu Family Time Game

When our family is actually all home together after dinner at the same time, we sometimes play games as part of our quest to SMILE.  Not too long ago, we came up with ain impromptu post-dinner family time game that was a big hit.

We Build It
A Family Time Game that Promotes Early Reading, Early Math, Creative Thinking and Cooperation


Materials

·       a basket or bin of SmartMax Extreme (one of our favorite Timberdoodle splurges ever; other building materials could work too, such as pipe cleaners, Tinker Toys or Wikki Stix)


·         a spinner with numerals on it (We have one from an old Game of Life with missing pieces that we tossed. We like its 3-D aspect and the fact that it has numerals 1-10 on it.) 


·        scrap paper with target words written on them (We used basic CVC words, with some challenge words and words from favorite DK Star Wars early readers thrown in, such as "blaster", which Nina surprised us by reading!)


·         imagination

a blaster gun
Goal

Cooperatively design and build a creative structure.

Building a Star Wars Blaster

Set Up

  1. Place bin of building toys and deck of word cards in the center of all players.
  2. Spin to see who will go first.
  3. Have Player One draw and read a card.


Simple Steps to Play

  1. Player One draws a word card and reads it.  Whatever it says is the inspiration for what the group will build.
  2. Player One spins the spinner and chooses the same number of pieces from the building toy pile as is shown on the spinner.
  3. Player One begins building the structure with those pieces.
  4. Player Two spins the spinner, chooses pieces according to the number shown and adds to the structure.  (No one may take another player’s pieces off the structure.)
  5. Play continues as such until a player finishes adding his or her pieces to the structure and suggests that the structure is complete.  when this happens, the other players must come to a consensus of if the structure is, indeed, complete, or it other turn should be taken to complete it.
  6. Once a structure is complete, Player Two begins a new round by drawing a word card.
  7.  
Skills

    • Reading (decoding phonics, recognizing sight words or both)
    • Fine Motor Skills (picking up cards, spinning spinner and manipulating building pieces)
    • Numeracy (recognizing numbers, adding pieces, etc.)
    • Creative Thinking (creating and adapting structure)
    • Cooperation/Teamwork (working together to create a design)
    • Problem Solving and Flexibility (figuring out how to adapt the design someone else has begun match the one you envision in your own mind)
    • Focus (concentrating on the goal of building the structure to match the word card)

Quick Tips/Extensions

  • If the youngest children in the family don't get how to play, simply give them a chance to add a few pieces on theri own.
  • This game can work for individual play, too.  After playing as a group, my children liked simply reading cards, spinning the spinner and building creations singly at times while I was occupied with chores.
  • To encourage crossing the midline,  set bin of buildable pieces on one side of the playing space and designate the other side as the building area.
  • For children who need extra proprioception, set spinner and pieces at one end of a hallway or room and a tray for building on at the other.

We’d love to hear your ideas for variations an extensions of this game, as well as TV-free ways you enjoy post-dinner for family time!


LinkWithin

Related Posts with Thumbnails