Sunday, February 14, 2016

Lest You Think Life Is Ideal...

Happy Valentine's Day!


Bah!  Hardly.

Today was not the happiest of days here.  In fact, it was one of those disheartening days that I typically do not share about publicly online since, years ago, God laid it on my heart to use this blog and my Facebook page as places to share mostly things that are encouraging, educational, inspiring, or heartwarming.

So why share something different today?

Because I sense that doing so may actually be encouraging to someone.  For, I bet there is someone out there reading this right now in the midst of "one of those days".  I would guess there is someone who knows that life is blessed, yet still feels distressed.  I dare say there may be someone who has plenty to sing praises about, yet feels too out of tune to do anything but wallow and wail today.

Well, let me tell you.  You are not alone.

Things in my life - and in lots of folks' lives - may look pretty ideal, but, let me assure you, they are very, very real.  Even when nothing tragic happens, little "straws" build up and, out of the blue, break "Mama Camel's" back.

You get to bed too late one night and just want to sleep in the next day, but, then, a child who has wet one bed without you knowing it crawls in beside you and wakes you up by wetting your bed.. and you!

You shower, strip the bed, throw the linens in the laundry, and opt to use the early wake up time to read devotionals and pray.  But, then, your whole crew of kids, who also went to bed too late the night before, wake up and start squabbling.  At that point, you discover the other bed that was wet during the night.  Super.  More laundry to do on the one day a week that you attempt to take a break from most work and chores.

Not to be too chagrined, you carry on with the morning, offering the children supplies to make Valentines. 

Later, you begin to make your family a Valentine breakfast, eager to start the communal part of the day off with smiles.  As you do, you are hopeful that the day will turn out to be a joy-filled relaxing one.  You'll enjoy the Valentine's breakfast you are preparing, then, the family will be off to Mass, where one child will serve on the altar, while another sings in the choir, and a third gets Mom-and-Dad time in a pew.  Then, there will be more fun food at lunch, plus plenty of time for family read alouds, maybe some games, a cuddly movie...  You know, good old-fashioned, happy togetherness.  

An ideal day awaits.


Or not.

When you ask the children to get dressed, one child begins to act out.  Meanwhile, as you prep breakfast, you go to clear the dishes that someone left in the sink, only to realize that the dishwasher is full, but, thankfully, clean.  You glance at the clock and realize that there is no time to empty the dishwasher, get the sink cleared, finish making breakfast, and get food into bellies in time to get family to Mass.  Further, not only does no one seem motivated to help you set the table, but the child who was acting out when told to get dressed is now continuing to carry on, "needing" your help with something while another "needs" your attention for something else...


You speak aloud that you are doing your part and need others to do theirs.  You begin to list what needs to be done, what you have and will do, and what others might take responsibility for.  You, fail, however to keep your list related to just the moment at hand, and worse, you fail to speak with a calming, cheerful, encouraging voice as that one child ratchets up the getting dressed nonsense.

At that point, your husband snaps at you, unhappy with your "litany".  His negative words are among the first he has spoken to you that day. 

And so the devil makes his entrance, slowly, steadily, into the day...

Breakfast becomes a farce: heart-shaped pancakes and handmade Valentines juxtaposed with Dad's quiet disdain and Mom's tear-brimmed eyes as a child, who at the moment acts more grown up than parents, attempts to brighten everyone's moods.  You begin to pray inside your head that you can hold your tears back and that Mass will be heartening and healing.
You continue to do so on the way to Mass, but emotion is too strong.  The silent tears begin to flow and the more you try to stop them, the more they come.

Nothing dramatic has gone wrong.  Just little things.  Just life.  But sometimes those little things hit hard and a day dissolves into a sadness so great that even Mass and one child's loving encouragement cannot help the hurt.

As the day continues, a headache complicates heartache. 

Little things begin to go right, but other little things continue to go wrong.  The latter get magnified by the devil's ceaseless niggling.

You know what is happening, yet, for some reason today, you cannot turn the tide.  Tears keep coming forth.

You beat yourself up for being ridiculous.  You remind yourself that have a warm home to protect you on a frigid day.  Festive foods grace your table.  Your family is all there and healthy.  Yet, alas, you still feel sorrow-filled.

Lent.  It is here.   


Mercy and grace.  They are, too.   Sometimes they are even spoken to you through a child who asks you not to cry, lets you know you are loved, and tells you, "Today is over.  Tomorrow will be new."

That it will.

But, before this day ends completely, I share this snippet of reality.  I do so not to blaze something gloomy it into annals of memory, but to be authentic and to affirm that while things may often seem ideal in other people's worlds, it is likely they are not.

None of us is perfect.  No day is either.

We are called to live the fabulous and the flaw-filled equally.  We are asked to carry crosses and, although sometimes, we do so with oh so little fortitude and seeming grace, grace still abounds.

Even on days when the goodness and glory of life gets overshadowed by mountains of silly little things - or even horrendous big things - one thing remains eternal.  LOVE.

You may not feel it.  You may not embrace it.  You may not express it, nor receive it well on a given day, but it is always there.

Praise be to God that even when so little seems ideal, love IS real.


Whether today was a happy Valentine's Day or not for you, may you never forget that you are loved.  I offer prayers for you right now.  Honestly.  I am going to bed praying for anyone and everyone whose day was less than ideal.  You are loved.

Sunday, February 7, 2016

Check Out Our Beautiful New Lenten Learning Tool!


As I prepare for Lent this week, I am excited by a new Lenten learning tool we'll be using this year:  Our Lenten Resurrection Eggs!


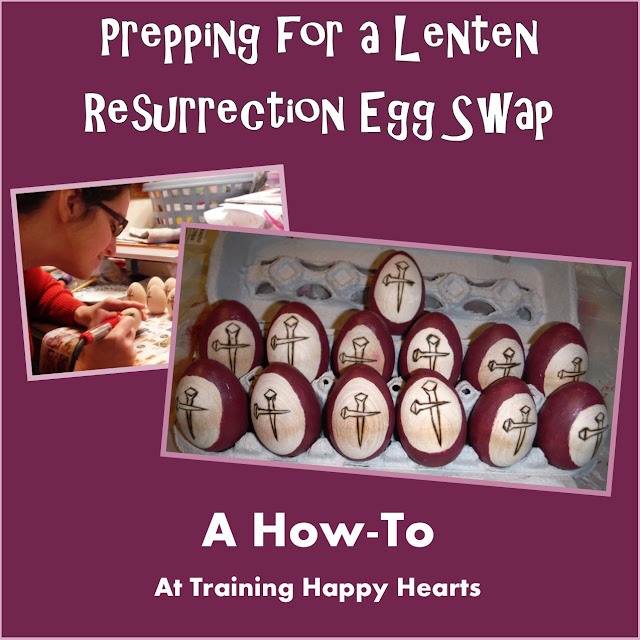
These eggs entered our home last week as the culmination of a local swap I participated in, which was inspired by Sarah, from Frugal Fun for Boys and her DIY Resurrection Eggs.  (I offered a How-To last week based on my experience.)

http://traininghappyhearts.blogspot.com/2016/01/make-your-own-lenten-ressurection-eggs.html

For our swap, each participating mom was asked to use paint, Sharpies, or a woodburning tool to create 13 eggs of a single design.  These eggs were then swapped for a set of 12 eggs to take home.  (The 13th egg each of us made went to a full set to be donated to a local Mom in need.)

Moms were also asked to paint the backs of their eggs.  Don't you just love how the collection of colors came out?

And, are you wondering why one egg is missing?  My children did, too.  So, I explained the truth to them:  Unfortunately, on the day of our swap, one mom was sick, so we are still waiting on our Day Four egg.  Until we get it, we can use the empty space as a reminder to pray for her and her family.

We will also put a list of who made which egg to keep in our egg box so we can remember to pray specifically for each of the families that participated in the swap as a part of our Lenten commitment to spend extra time in daily prayer.  (We did this same thing thing with our Jesse Tree and 12 Days of Christmas ornaments with much success.  The children loved recalling who made each swap item and offering special prayers for the families of the moms who made them.)

Want to See Our Eggs Up Close?


As I examined our eggs after receiving them, I loved the perfection of their imperfections.  Each egg is unique and beautiful on its own, and made even better as a part of a full collection.  See:


#1 A Palm Branch = People welcomed Jesus with palm branches during His triumphal entry into Jerusalem. 

#2 Bread and Wine = Jesus and the apostles gathered for the Last Supper and the institution of The Lord’s Supper.

#3 Lamb = Jesus became our Passover Lamb.


#4 Money Bag = Judas betrayed Jesus for 30 pieces of silver. (This one has yet to come, because one mom was sick.)

#5 Sword = Judas led an angry mob of Jewish leaders to Jesus in the garden, and Peter cut off the ear of the High Priest’s slave. Jesus healed the ear.

#6 Crown of Thorns = A crown of thorns was placed on Jesus' head.


#7 Nails = Jesus was nailed to the cross.

#8 Garment = The Jews cast lots for Jesus’ clothes, which fulfilled prophecy.

#9 Cross = Jesus was crucified.


#10 The Temple Veil =The veil was torn in two from top to bottom at Jesus’ death.

#11 Three Crosses = Two criminals were crucified next to Jesus.

 #12 The Empty Tomb = He is risen!


How Will We Use Them?

Throughout the Lenten season, our new Resurrection Eggs will be out as a decoration and hands-on tool.  On Ash Wednesday, I plan to use the eggs to prompt my children in a spontaneous retelling of the Easter Story.  After that, we'll use them as a reminder to pray for some of our local friends as well as for other intentions.  And, besides that, we'll use them however the children decide to do so, which, no doubt, will include keeping a young friend of ours entertained.


(A friend of mine took this picture of her son as he played with the eggs on the day I received them.  So cute!)


However we use our eggs, I know they will dovetail beautifully with past hands-on tools we've used during this season, which include:

http://traininghappyhearts.blogspot.com/2014/03/prepare-your-own-sensory-smart-holy.html


(Note: Some links in this post are affiliate ones.  If you click through them to make any purchase, we may receive compensation.)


http://traininghappyhearts.blogspot.com/2014/04/planning-hand-on-holy-week.html


Yes, our new Lenten Resurrection Eggs will be a welcome addition to some of our other family Lenten activities!  I am grateful to have participated in the swap.


What tools and traditions help you and the children in your life observe Lent?

Sunday, January 31, 2016

Make Your Own Lenten Ressurection Eggs

Swap-happy me has been at it again:


After realizing what NOT to do for a peg doll swap...

 
http://traininghappyhearts.blogspot.com/2015/11/saint-peg-doll-swap.html 

...sniffing all too many sharpies while making ornaments for a Jesse Tree swap...
 
http://traininghappyhearts.blogspot.com/2015/11/jesse-tree-swap-ornmanet-ideas.html


...and modge podging like mad for a 12 Days of Christmas ornament swap...


http://traininghappyhearts.blogspot.com/2015/12/12-days-of-christas-ornament-swap.html

..I decided I would teach myself how to wood-burn for an upcoming Lenten Resurrection egg swap.

(Note:  Some of the links below are affiliate ones.  Should you click through these to make any purchase we may receive compensation at no extra cost to you as per our Full Disclosure.)

 
How I Made Our Lenten Resurrection Swap Eggs

First, I broke our our brand-new woodburning kit, which we got at a discount around Christmastime in preparation for this project, and the bag of wooden eggs, which a friend purchased in bulk and divided with swap members.  I searched for the smoothest of the eggs since I wanted to dive in for the first time without having to sand.


Then, while the woodburning tool was heating up, I began searching for and sketching images of my assigned image:  nails.  An easy image, I know, but I wanted to land on a design that had a bit more oomph than a single nail or two.  So, the kids and I set to brainstorming.


Once I settled on an image, I drew it on a paper, turned the paper over, and colored the backside with pencil. I did this on scrap paper so the pencil markings from the drawn nail side would not transfer onto my table.


I then flipped the paper over on the image, and traced it.  Thereby transferring the image of the nails I had settled on -- old style nails in the shape of a cross -- into the egg.


Image drawn, it was time to woodburn. 

My first go went well, but I did end up learning something that I passed on in our swap group page:

When aging with long hair, pull your hair back before wood burning. As my developing need for bifocals got the best of me, I leaned close to my woodburning tool and egg. A bit of hair told me how close I was when it gave a singe scream (a quiet one) and sent off a putrid smell to break the silence of my woodburning concentration. Pony tail holder now in place! LOL


After burning just two eggs, my kids joined in the craftivity at our kitchen table by beginning to paint peg dolls for a kids' swap.  So, that was the end of my woodburning.  I simply could not concentrate on my project while helping them with theirs. 

The next day, Nina, grateful for my help the day before, offered to help me sand the rougher wooden eggs in my bag. 


We sanded and sanded, using multiple grades of sandpaper, but many of the eggs just would not completely smooth.  So, after consulting with several swap members, including the swap coordinator, I gave up on the sanding and added this tip to my future swap brain file:
Accept rough surfaces or buy Grade A eggs.  The "seconds" we bought just did not want to get smooth!

At that point, it was time to transfer the image onto the 11 eggs I had yet to do.  (All of us in the swap are doing 13 eggs so we can each keep one full set while donating a full set to a local mom!)


Then, it was back to my woodburning, with my hair tied back to avert further singing and my neck craned forward to make up for my aging vision. (Learning humility and acceptance is a BIG part of these swaps for me.)


Since my daughter wanted to help with this part, I let her play photographer, and, then, after she had been watching me carefully for some time, I allowed her to use a hand-over-hand method to burn some of the eggs with me. 

And, yes, before I let her delicate hands get so close to the ultra-hot tool, I said a prayer to both of our guardian angels.  For, while she had proved her patience and I was confident that she could burn the wooden eggs with me, I was nervous while guiding her little hand.

After letting her do a few eggs with me, I suggested she go back to being our photographer.


Between my daughter's efforts and mine, this is what our eggs looked like once they were all burned.


So, it was time for painting. 

The acrylic paint color I chose to paint the eggs looked like it was going to be a muted, almost pastel, "blood" color.  However, once I got it on the egg tops, I realized it was much darker.  I decided to go with the color even if it was dark since it seemed fitting for the nail image.


So, I after the tops dried enough, I did the fronts of the eggs, the back, and the bottoms, all leaving drying time in between.

The hardest part was the oval around the burned nail image.  I started these ovals quite wide around the images because I do not have the steadiest hands, and, then, each time the line of an oval looked too uneven, I simply closed the oval in a bit.  I found by tipping a paint brush on its side, holding it close to an egg, and rotating the egg around slowly, as opposed to moving my paint brush hand, I had the most luck.


Finally, all the eggs were done.  They were not perfect, but they were as good as I could get them and I was afraid if I kept trying to improve them, they would end up worse, not better.
 

I let the eggs dry for a day, did a few minor touch ups, let them dry again, and then set to sealing them. 

I had used layers of Modge Podge to seal things in prior swaps, but had since been told that it was not the best sealer.  So, upon a recommendation, I purchased Triple Thick glaze spray for this project, thinking it would be quick and easy to apply, with beautiful long-lasting results.


Such was not the case...
  First off, I thought our home was well-ventilated enough when I went to spray the eggs, but it was not.  I almost asphyxiated us all, I think.   Second, as soon as I sprayed, paint began to run off my eggs. Disaster!


Seeing my hard work at painting ovals arund woodburnt images dissolve, I tried to pick one egg up to wipe the running paint off with a rag, only to realize the was super sticky.  So, I did a quick wipe, used soap, water, and alcohol on my hands to wash the stickiness off, and, then, grabbed a plastic bag to use as a glove.

With speed, I "saved" as many eggs as I could and, then, transferred them all onto new bags to dry, so I could throw out the other smelly, sticky, paint-glaze pooled bags in the outdoor trash.


Since I did not want anyone to face the same near-demise my eggs did, I immediately posted in our local swap group about what happened and also asked about others' experiences in a national swap group.  I learned that many use Triple Thick, but few ever use spray, while others prefer Minwax.  I also learned that our local swap leader, indeed, uses Triple Thick spray for projects, and has for years, without any incident.So, after another 24 hours or more of letting the eggs dry, I bravely took the eggs outside on a tray and gave them a second coat to cover over anywhere my first effort at sealing may have failed due to my handling the eggs to wipe off running paint before the eggs had dried. 

This time, the spraying went much better.  No big runs happened and, after leaving the eggs on the stoop for several hours, I was able to take them in, let them dry over night, and transfer them to a carton.I was sad as I did so over the eggs that had been ruined.  However, I cheered up when another swap member who'd stopped by to return my woodburning tool, which she had borrowed, took a look  and said they were fine.  She could not believe how smooth my ovals were.  (Really?!?)  And, she thought the eggs had homemade character.  (Such a sweet and encouraging friend!)


So, now, my eggs sit ready to be swapped.  I cannot wait to see what the other moms did and to get my whole set of wooden Lenten Resurrection Eggs.


Credit Where Credit Is Due

Sarah, from Frugal Fun for Boys, inspired our local swap coordinator to suggest this swap.  Head on over to her DIY Resurrection Eggs post to checkout her wonderful work!

No Time for Crafting?
 

http://traininghappyhearts.blogspot.com/2014/03/prepare-your-own-sensory-smart-holy.html

If you don't have time for wooden egg crafting, you can easily whip up some sensory smart Holy Week/Resurrection eggs like I have done in the past.


You can also purchase ready-made ones, like this set we found at a thrift shop a couple years ago and enjoy annually.
 

http://traininghappyhearts.blogspot.com/2014/04/planning-hand-on-holy-week.html

Or, dispense with the eggs altogether, and enjoy some hands-on Holy Week art instead.


There are so many ways to bring the Resurrection Story alive for children.  How do you teach and review it with your kids?

Wednesday, January 27, 2016

When the Art-n-Nature Hiking Club Does No Hiking Nor Art...

Sometimes things do not go as planned and that is A-okay!


Last August,
we re-initiated our Art-n-Nature club, planning to organize at least one outing each month for local friends to get together to hike and enjoy art outdoors.  That plan worked well in August and September, took a bump in October, came back strong in November, lost its art portion in December, and, found us planning to "sled and sculpt" this month, only to have us drop the sculpting idea last minute.

For our sixth meet-up since re-initiating the club, our game plan was to enjoy "hiking" up a favorite sledding hill and sculpting forms in the snow using whatever tools and natural decorations that people brought or found.


However, when we got to the sledding hill, we realized the sun had gotten there before us, leaving us just enough snow to sled upon, but not quite enough for sculpting.


No one minded this one bit!  The weather was warm.  The day was ideal for sledding, so the four families that joined us simply delighted in chatting, sledding, and picnicking outdoors together.


No hike.  No art.  No problem.  There were still plenty of smiles shared outdoors by adults and children.   


Smiles and sledding! Got to love when everyone enjoys simple pleasures together, no matter what age!

New friendships form.

Old friends enjoy one another's company.
 

Mamas and their children smile, knowing life is what happens when you're making other plans... and life is blessed!


I cannot wait to see how the blessings of our Art-n-Nature club continue to unfold.


We're excited to continue our Art-n-Nature initiative and welcome YOUR suggestions for cold-weather art projects that can be enjoyed in February and March.  Please leave links and ideas in a comment or at the
Training Happy Hearts Facebook page.  Thank you!

Tuesday, January 26, 2016

Make Your Own Maple Syrup {A Tap Your Trees Review}


"Whoo hoo!" my kids cheered when I told them that we would be able to review the Starter Kit with Aluminum Buckets from Tap My Trees. They love maple syrup and for years have been asking if we make some ourselves.

Until now, I admit, I have responded to my children's pleas to harvest our own maple syrup with a half-hearted, "We'll see..." For I just was not sure I had the knowledge, means, nor energy to take on such a project. However, now that we have the Tap My Trees' Starter Kit in hand, my "We'll see..." has become a "You bet!"

Yes, 2016 will be the year my kids finally get to try their hands at making their own maple syrup! 

Everything You Need for Sugaring Except a Drill and a Tree  


Although I knew what we'd be getting in our Starter Kit before it arrived, I was still pleasantly surprised when our Tap My Trees came in. For I just love a company that has personality and pays attention to detail, and, from the first moment I saw our kit all packaged up, I knew Tap My Trees is a company to love. 

Every item in the box was received was carefully (but not excessively) packaged and the box itself spoke of the company's story:


Joe McHale took a simple way to teach his family about nature and the origin of food and became the #1 supplier of maple sugaring supplies for hobbyists, no doubt, by making sugaring accessible through a clearly written, step-by-step guide that takes you from identifying tress to tap to boiling sap into maple syrup, and everything in between. 


The guide clearly describes how to:

  • select trees for tapping
  • tap trees
  • collect and store sap
  • clean and sanitize supplies
  • make maple syrup
  • use sap for purposes other than maple syrup
  • wrap up the sugaring season

The book also contains Frequently asked Questions, a Resources list, a Quick Reference Checklist, and blank Note pages.  

Tap My Trees Review


Joe McHale paired this slim, yet complete 44-page guide together with everything you need to begin your own family adventure in maple sugaring in order to make a kit that can get anyone with a drill and a tree started. The provided supplies include:


  • 3 2-gallon Aluminum Buckets to collect sap in as it drips from the spile
  • 3 Metal Lids to prevent rain, snow, and foreign material from entering the bucket
  • 3 Stainless Steel Spiles (taps) to be inserted into drilled holes to transfer sap into a bucket
  • 3 Hooks to be attached to spiles and used to hang the buckets
  • 1 7/16 Drill Bit with 3/8 shank in order to drill tap holes into your maple trees
  • 1 Cheesecloth used to filter any solids (such as pieces of bark) when transferring sap from the collection buckets to a storage containers


Getting Started 


Right on the box of the Starter Kit is a handy flow chart of how and when your maple sugaring season might progress.


As noted on it and in the clip below, ideally, you identify which trees to tap in mild weather: 

 
Or, if you are silly like my daughter and I, you wait until after you've got a good layer of snow and then run out, all excited to get get started, less-than-appropriately dressed for the season.
 

"Mean Mama" that I am, I would not let my kids dive too far into our Maple Sugaring
Starter Kit until after the Christmas season was over and I had a chance to read through the included guide (which took very little time once I actually finished seasonal hoopla and sat down with it!) So, when I finally okayed the kids to unwrap, read, and be read to, my daughter literally jumped with excitement (this the blurry picture): 


And, without pausing to put on leggings or snow pants, got right to measuring one of the trees in our front yard: 


And, then, she measured another, and another... 


After doing so, we headed back inside and referred back to the guide, where we affirmed that we could put all three of our buckets on one tree. However, for fun, my daughter would like us to tap more than one tree. 


My oldest boy, meanwhile, has been reading up on our next maple sugaring steps on his own. I dare say he'll be an expert on both the how-to's and the why's of maple sugaring in no time.  


For, having enjoyed sap straight from trees on past maple sugaring tours and at a friend's house before, he fancies the idea of drinking sap straight from our own trees. And, now, he knows it is purported to be healthy to do so as well!


Of course, he doesn't want us to drink all the sap, though. Some, he says, must be made into syrup so we can make "sugar on snow" like he did after a recent snowfall, but, this time with our own homemade sugar. 


Yes, indeed, none of us can wait to see something like this right out our own front door:

Tap My Trees Review

With the guide book read, trees picked and supplies on hand, soon the tapping and sugaring can begin! Whoo hoo! 

Learn More 

We are well-pleased with the quality of he guide and supplies contained in the Starter Kit by Tap My Trees and think other families seeking to learn about maple sugaring and to try their own hands at it would be, too. So, if you have maple walnut, or birch trees nearby and want to begin home-based maple sugaring, head on over to Tap My Trees to get started. You'll find all the supplies and information you need there and get free shipping on it all. 

Tap My Trees Review

You may also wish to read what 15 Schoolhouse Review Crew families think of Tap My Trees. 

Tap My Trees Review

Or, perhaps you'd like to get social with
Tap My Trees at: 


Might this be the year YOUR family begins maple sugaring, too? 

Crew Disclaimer

LinkWithin

Related Posts with Thumbnails